CenterPoint Payroll
- Publish Pay Advices - Installation, Registration, and Processes
This document includes the following topics:
Configure the Publish Payroll Advices Add-on Module (One-time Setup)
Register the Publish Payroll Advices Add-on module (One-time Setup)
Specify Payroll Contact Information
Enroll Multiple Employees in the Publish Payroll Advices Service
Enroll Individual Employees in the Publish Payroll Advices Service
Resend an Available Advice Notification to an Employee
Unenroll Employees from the Publish Payroll Advices Service
Synchronize CenterPoint Payroll Information with Publish Pay Advices
Configure the Publish Payroll Advices Add-on Module (One-time Setup)
- Select File > Administration > Module Configuration Manager.
- Select the Publish Payroll Advices - Requires Direct Deposit check box. Click OK.
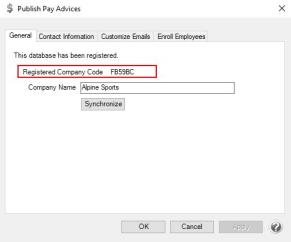
Register the Publish Payroll Advices Add-on module (One-time Setup)
- Select Setup > Payroll Details > Publish Pay Advice Settings.
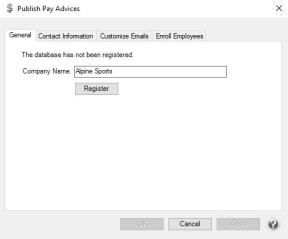
- Click Register. Wait while the registration processes.
- When the registration is complete, a This database has been registered. message and your Registered Company Code displays.
Specify Payroll Contact Information (Setup > Payroll Details > Publish Pay Advice Settings)
- Select the Contact Information tab.
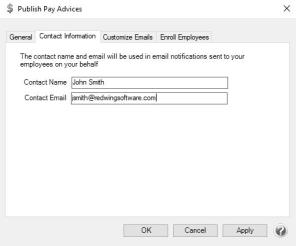
- Enter the Contact Name and Contact Email address.
Customize Email Notifications - Optional (Setup > Payroll Details > Publish Pay Advice Settings)
- Select the Customize Emails tab. This tab allows you to determine the content of the emails generated by the Publish Payroll Advices module.
- Select the Type of email message that you wish to customize. Advice Published, Employee Enrollment, or Employee Unenrolled.
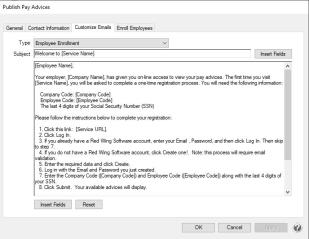
- The Subject can be edited to any text you prefer. If you want the system to insert fields from a list of Subject fields stored in the Publish Payroll Advice module, click the Insert Fields button from the top right side of the screen.
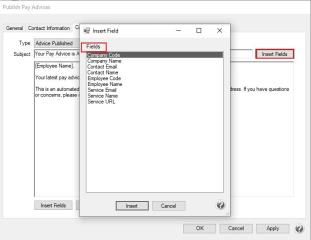
- Select the Field to insert, and then click Insert. The selected Field will display in between square brackets, for example the Subject below was edited to "Your Pay Advice is Available from [Company Name]".
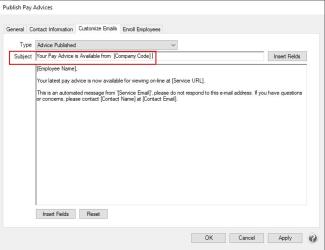
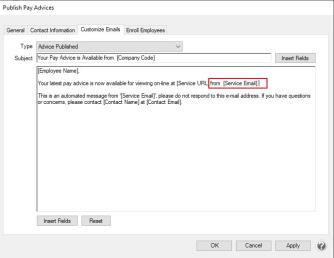
- The body of the email can be edited to the text your prefer. If you want the system to insert fields from a list of Body fields stored in the Publish Payroll Advice module, click the Insert Fields button from the bottom left side of the screen.
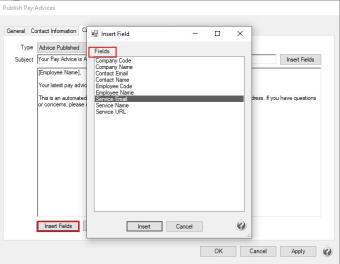
- Select the Field to insert, and then click Insert. The selected Field will display in between square brackets, for example the body of the email was changed to include the was edited to include the Service Email field, for example "Your latest pay advice is now available for viewing on-line at [Service URL] from [Service Email]."
Note: If you insert fields or edit the standard email text and you wish to return to the default information, click Reset.
Enroll Multiple Employees in the Publish Payroll Advices Service (Setup > Payroll Details > Publish Pay Advice Settings)
- Select the Enroll Employees tab.
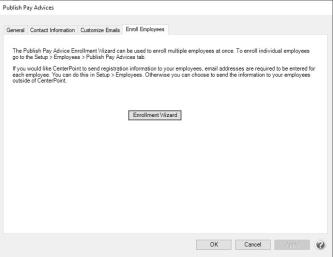
- Click Enrollment Wizard.
They now need to have at least one row of the direct deposit information filled in to show up to be selected in the enrollment wizard.
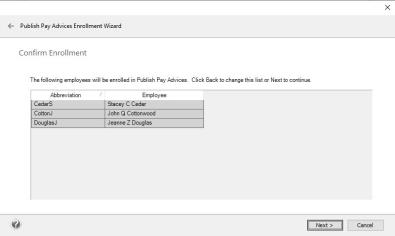
- From the left side of the screen, select the employees you wish to enroll and click the right arrow(s) to move them to the right-side of the Select Employees to Enroll screen.
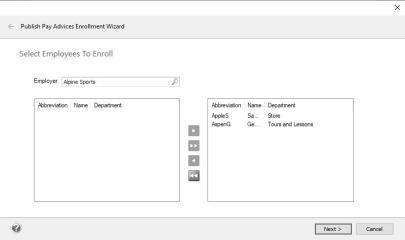
- Click Next.
-
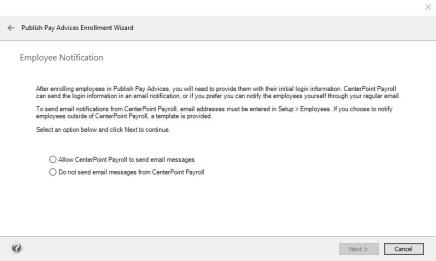
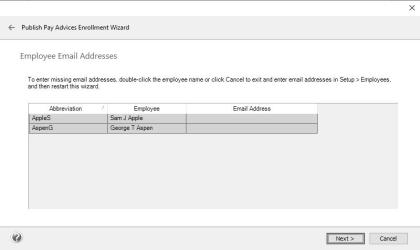
After enrolling employees in Publish Pay Advices, you will need to provide them with their initial login information. This can be done outside of CenterPoint with a template provided to you or if you prefer, CenterPoint can send the login information to employees via email which requires email address to be entered in Setup > Employees.
-
Select how you want to send the login information to your employees.
- Click Next. If you selected:
- Allow CenterPoint Payroll to send email messages
- At the "These employees will be enrolled in Publish Pay Advices and sent an enrollment email message" click Yes to enroll the selected employees.
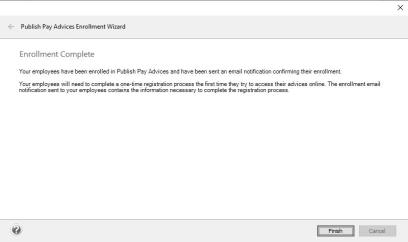
- An email message will be sent informing the selected employees that in order for your employees to access their online pay advices, they must register at payadvices.redwingsoftware.com with your Registered Subscriber Code, their Employee Code, and the last four digits of their Social Security Number. This information is in the default Employee Enrollment email message on the Customize Emails tab.
- Click Finish.
- Do not send email messages from CenterPoint Payroll
- At the "These employees will be enrolled in Publish Pay Advices, click Yes to enroll the selected employees.
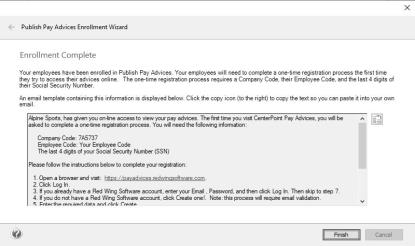
- In order for your employees to access their online pay advices, they must register at payadvices.redwingsoftware.com with your Registered Subscriber Code, their Employee Code, and the last four digits of their Social Security Number.
- To use the template displayed on the screen in your email you will send from your own email provider, click the Clipboard icon
 , open your Email software, and press Ctrl + V to paste the text into your email, and then add your contact information. Send the email to the employees that need to be notified about the registration process.
 - Click Finish.
- Click Next. If you selected:
-
Enroll Individual Employees in the Publish Payroll Advices Service
- Select Setup > Employees > Publish Pay Advices tab.
- Click the Publish Pay Advices check box.
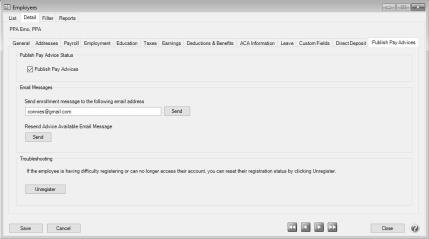
- If you would like CenterPoint to send the employee an enrollment email with instructions for registering, verify that the email address that displays in the Send enrollment message to the following email address box is accurate. If the enrollment notification should be sent to a different email address, change the displayed email address. If you choose not to send the enrollment email, you will need to provide instructions to your employee outside of CenterPoint.
- Click Send.
- See the Frequently Asked Question section of this document for information about troubleshooting Publish Pay Advices.
- Click Save.
- Click Close.
Publish Payroll Advices
Option A - While Processing a Pay Run
- Process payroll following your usual procedure until you make your selections on the 6. Print Checks tab, continue with Step 2.
-
Select the Publish Pay Advices check box to publish payroll advices for the employees enrolled in the Publish Payroll Advices service.
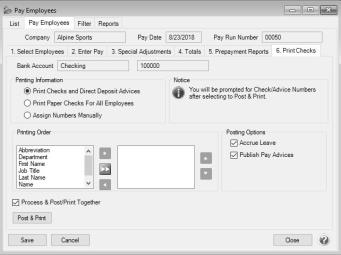
Note: The posting Options selection will be saved for each database you process payroll for.
- Continue processing payroll as you normally do.
- At the payroll successfully posted message, click OK.
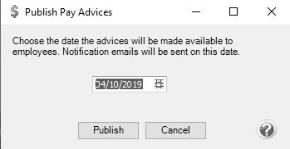
- If you selected the Publish Pay Advices check box, choose the date the advices will be made available to employees (the date will default to the pay date) and then click Publish.

Option B - After Posting a Pay Run
- Select Processes > Publish Pay Advices > Publish Advices.
- The last 31 days of pay runs will be displayed with the status of the published pay advices for the pay run.
Note: The default to display the last 31 days of pay runs can be changed. Click Refresh to redisplay the screen if the filter is changed.

- Under the Advices column, the first number is the advices that have already been published
- Under the Status column, the following can display
- Published - This status displays when a pay run includes enrolled employees that had the Publish Pay Advice check box selected when the pay run was posted and payroll advices were published.
- Ready to Publish - This status displays when a pay run includes enrolled employees and the Publish Pay Advice check box was not selected when a pay run was posted.
- Partially Published -This status displays when payroll advices have been published and one or more advices were removed in Processes > Publish Pay Advices > Remove Advices.
- Voided -This status displays when a pay check or pay run for an enrolled employee with published pay advices has been voided.
- To publish payroll advices for a pay run with a Ready to Publish, Partially Published, or Voided status, select the Include check box and then click Publish.
- Choose the date the advices will be made available to employees (the date will default to the current system date) and then click Publish.
-
Note: The Advice Published email notification text from Setup > Payroll Details > Publish Pay Advice Settings > Customize Emails will be sent to the email address the enrolled employees registered with from noreply@redwingsoftware.com on the date selected above at 12 AM. Advices will not be available online and email notifications will not be sent until the date selected above.
- The status of the pay runs will change to a Published status as shown below.
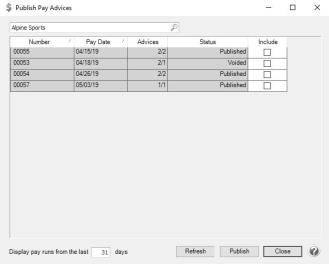
- Click Close.
Remove Published Pay Advices
- Select Processes > Publish Pay Advices > Remove Advices.
- Select an Employee you want to remove published pay advices for or leave blank to include all employees.
- Select a Pay Run you want to remove published pay advice in or leave blank to include all pay runs for the selected employee.
- Click Find.
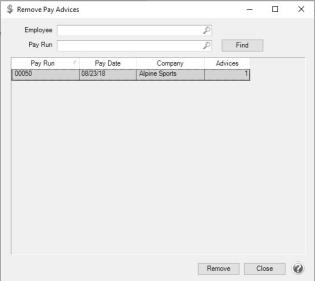
- Click Remove. All pay advices displayed will be removed. Individual pay advices can be selected if you select a specific employee and pay run combination.
- At the Remove Publish Pay Advices form the web. Are you sure? message, click Yes.
Resend an Available Advice Notification to an Employee
- Select Setup > Employees > Publish Pay Advices tab.
- Under Resend Advice Available Email Message, click Send.
- Click Save.
- Click Close.
Unenroll Employees from the Publish Payroll Advices Service
- Select Setup > Employees > Publish Pay Advices tab.
- Unselect the Publish Pay Advices check box.
- Click Save.
- Click Close.
Synchronize CenterPoint Payroll Information with Publish Pay Advices
Publish Pay Advices and CenterPoint Payroll data is continuously synchronized. If employee and company data is not reflected correctly in CenterPoint Pay Advices (online) then the data can be resynchronized.
- Select Setup > Payroll Details > Publish Pay Advice Settings.
- Click Synchronize.
- Click OK.
Frequently Asked Questions
Q: How do I change the email address that an employee uses to log into CenterPoint Pay Advices?
A: To reset the registration status of an enrolled employee:
- From CenterPoint Payroll, select Setup > Employees.
- Select the Payroll Advices tab.
- Under the Troubleshooting section, click Unregister.
- At the This will unregister the employee's user account from Publish Pay Advices and they will have to re-register to access their advices, are you sure? message, click Yes.
- If the unregister is successful, at the Employee Unregistered message, click OK. If the unregister is not successful, you will be prompted to try again later..
- The employee will need to register with CenterPoint Pay Advices again by creating a new account with their preferred email address. If you click Send (next to the displayed email address), a new enrollment notification will be sent with detailed information about registering. If you choose not to send the enrollment email, you will need to provide instructions to your employee outside of CenterPoint or the employee can follow the Employee Registration (One-time Setup) section in the Using Publish Pay Advices document.
Q: Can the default e-mail messages be changed?
A:Yes. To change email messages:
- In CenterPoint Payroll, select Setup > Payroll Details >Publish Pay Advice Settings and select the Customize Emails tab.
- Select the Type of email message that you wish to customize. The email types are:
- Employee Enrollment
- Advice Published
- Employee Unenrolled
- The Subject and Body of the email can be edited to any text you prefer. If you want the system to insert fields from a list of Subject fields, click the Insert Fields button from the top right side of the screen. If you want the system to insert fields from a list of Body fields, click the Insert Fields button from the bottom left side of the screen.
- Select the Field to insert, and then click Insert. The selected Field will display in between square brackets [ ].
Q: The notifications that are sent from CenterPoint Publish Pay Advices specifies a contact name and email address for questions. Where does this information come from?
A: The contact email address used in the notifications is set in Setup > Payroll Details > Publish Pay Advice Settings > Contact Information tab in the Contact Email box. The email address, as well as the Contact Name can be changed.
Q: I have an email address setup in Setup > Employees on the General tab for an employee, but they are not receiving Advice Published email notifications at that email address. Where are the notifications being sent?
A: The employee will only receive pay advice notifications at the email address that they provided when they registered to use CenterPoint Pay Advices (online).
Q: I had to void a pay run (an individual pay check) in CenterPoint Payroll that had already been published. Do I need to do anything in Publish Payroll Advices?
A: When a payroll check or entire pay run is voided in CenterPoint Payroll, it will be marked as Voided in the Processes > Publish Pay Advices > Publish Advices screen in the Status column . If you wish to remove the voided pay run, it can be removed by selecting the Include check box and clicking Publish (the employee will not be sent an Advice Published notification). If a corrected pay run is processed, that new pay run/check can be published (there may be additional charges depending on which employee(s) pay advice was published and the month it was published).
Q: An employee didn't receive an email when they were enrolled in the Publish Pay Advices service or when new advices were published.
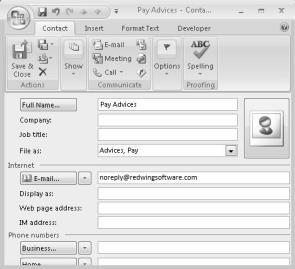
A: If an employee didn't receive a specific email, they should look in their Spam or Junk mail folders for the missing emails. This can happen if the employees email software categorizes the emails from the Publish Pay Advices service as junk or spam. To alleviate this from happening, enrolled employees should go into their email software and add noreply@redwingsoftware.com as a contact. All emails sent from CenterPoint Publish Pay Advices will come from that email address. Once an email address is added as a contact, it should normally be received into their in-box. This is an example of a contact added in Microsoft Outlook:
Alternatively, if an employee is familiar with marking a domain as safe in their email software, the @redwingsoftware.com domain can be added as a safe domain.
Q: Is it possible to resend an Enrollment or Available Advice e-mail notification to an employee?
A: Yes, you can resend both by following the steps below:
Resend an Available Advice Notification to an Employee
- Select Setup > Employees > Publish Pay Advices tab.
- Under Resend Advice Available Email Message, click Send.
- Click Save.
Resend an Enrollment Email Notification to an Employee
- Select Setup > Employees > Publish Pay Advices tab.
- Under Send enrollment message to the following email address, verify the displayed email address and then click Send.
- Click Save.
Q: Will employees be notified when a new pay run is published?
A: Yes. Each time a new pay run is published either from Processes > Pay Employees or Processes > Publish Pay Advices > Publish Advices, Advices Published the Advice Published email notification text from Setup > Payroll Details > Publish Pay Advice Settings > Customize Emails will be sent to the enrolled employees (that were included in that pay run) to the email address the employee registered with from noreply@redwingsoftware.com on the date you chose to have advices available to employees at 12 AM. The text of the e-mail will be similar to this:
George T Aspen,
Your latest pay advice is now available for viewing online at https://payadvices.redwingsoftware.com.
This is an automated message from 'noreply@redwingsoftwae.com', please do not respond to this e-mail address. If you have questions or concerns, please contact 'Payroll Administrator at payrolladministrator@payroll.com'.
Q: I have an employee that can't remember their password. Can I look it up for them?
A: To ensure passwords are protected, we do not have password look ups available. If an employee is unable to remember their password, they can reset their password online in CenterPoint Pay Advices.
To retrieve a forgotten password:
- Start CenterPoint Pay Advices, click Log In, and then click the Forgot your Password? link.
- Enter your Email address and click Email Link.
- An email will be sent to the address the employee provided.
- Open the Red Wing Software Reset Password email and click the here link.
- To reset your password, enter your Email, new Password, and Confirm Password, and then click Reset.
Q: Is there any type of reporting that will allow me to review which pay runs have been published?
A: Yes. In CenterPoint Payroll, select Reports > Reports > Publish Pay Advices > Payroll Advice Publishing Activity to show which pay runs have been published.
Q: What is the Synchronize button used for on the Setup > Payroll Details > Publish Pay Advice Settings > General tab?
A: Publish Pay Advices and CenterPoint Payroll data are continuously synchronized. If employee and company data is not reflected correctly in CenterPoint Pay Advices (online) then the data can be resynchronized using the Synchronize button.
Q: Where do I change the format of the published advice?
A: The published advice uses the format selected for printed advices. To choose a different format, select File > Preferences > Payroll > Printing- Advices .
Q: Do I need to print paper advices for employees who are getting a published pay advice?
A: No, if you do not wish to print pay advices for an employee because they are enrolled in Publish Pay Advices, go to Setup > Employees > Direct Deposit tab and uncheck the Print Pay Advice box. When payroll is posted and you are prompted to print pay advices, only advices for those employees with Print Pay Advice selected will print.
Q: I published advices and everything went well, except some of my employees have overflow stubs. When I published payroll advices, those employees only received the first sheet of their stub. What should I do?
A: If you have employees with numerous benefits, deductions, and taxes the system may, depending on the advice format selected, print some of their information on an overflow stub (2nd piece of paper). When advices are published, only one page is published, so we recommend you switch your format to Check/Detail (File > Preferences > Payroll > Printing - Advices > Select Advice Type) if you have employees with numerous benefits, deductions and taxes. The Check/Detail format will print all of the information on one sheet instead of two.
To correct those that were published before the advice format was changed, follow the instructions above to remove the pay run. After changing the Advice Type to Check/Detail, the pay run should be published again.
Q: What type of security is in place for published payroll advices?
A: Please refer to the Web Services Security topic for detailed information on the multiple levels of security built into CenterPoint Publish Pay Advices. CenterPoint also offers database security, please refer to the Users & Security topic for detailed information. The security policies used by CenterPoint Publish Pay Advices are as follows:
- Processes > Publish Pay Advices > Publish Advices > Allow Publish Advices
- Processes > Publish Pay Advices > Remove Advices > Allow Remove Advices
- Setup > Payroll Details > Publish Pay Advice Settings > Allow Set of Publish Pay Advice Settings
- Reports > Reports > Publish Pay Advices > Payroll Advice Publishing Activity > All Access
Q: I published my advices, but forgot to enroll one of my employees prior to publishing. What should I do?
A: First, enroll the employee using the Enroll Individual Employees in the Publish Payroll Advices Service section in this document. Then publish the same pay run again from Processes > Publish Pay Advices > Publish Advices by selecting the Include check box and then clicking Publish. Only the newly enrolled employee will receive an email notification the second time this pay run is published.
Q: How can an employee change their password in CenterPoint Pay Advices online?
A: An employee can change their password in CenterPoint Pay Advices online by following the steps below:
- From a web browser, enter https://payadvices.redwingsoftware.com
-
In the upper-right corner, click the down-arrow next to your name, and then select View Account.
- Click Change Password.
- An email will be sent to your current email address.
-
Open the Red Wing Software Change Password email and click the here link.
-
Enter your Current Password, New Password, and Confirm New Password, and then click Update Password.
.
Q: Do I have to publish immediately after processing payroll or can I wait until pay day to publish?
A: Pay advices can be published either during a pay run or after a pay run, and you choose the date the advices will be made available to employees.
Q: Can I publish a previous month's pay advices?
A:Yes you can publish pay runs from previous months, however you be will billed for any pay run(s) published from prior months.
Example: If you started using the CenterPoint Publish Pay Advices module in March and decided you wanted to publish pay advices for pay runs from January and February giving employees access to all of their pay advices for the current year, you will get billed for pay runs published from January and February even if they were not published until March.